
Are you ready to take your LED light strips to the next level? Hardwiring your LED light strips can give you a cleaner look, more reliable power, and better control over your lighting setup.
But if you’re unsure where to start or worried about making a mistake, don’t worry—you’re in the right place. In this guide, you’ll discover simple, step-by-step instructions that anyone can follow. By the end, you’ll have the confidence to hardwire your LED strips safely and efficiently.
Keep reading, and transform your space with seamless, professional lighting!
Benefits Of Hardwiring Led Strips
Hardwiring LED strips ensures a steady power supply and reduces clutter from cords. This method enhances safety and creates a clean, professional look for your lighting setup.
Hardwiring LED light strips can elevate your lighting game, offering a seamless and polished look that plug-in options simply can’t match. Whether you’re looking to illuminate your kitchen countertops or add a modern touch to your living room, hardwiring provides a range of benefits that make it worth considering. Let’s dive into why you might want to choose this installation method for your next lighting project.
Enhanced Aesthetic Appeal
Hardwiring LED strips eliminates unsightly cords and plugs, creating a clean, streamlined appearance. This is especially beneficial in spaces like kitchens or bathrooms where aesthetics are crucial. Imagine a kitchen with under-cabinet lighting that appears to float—hardwiring makes this possible.
Increased Durability And Reliability
When you hardwire LED strips, you reduce the wear and tear associated with plugs and sockets. This means fewer maintenance issues over time. Additionally, hardwired connections are less prone to accidental disconnections, ensuring your lights stay on when you need them.
Improved Energy Efficiency
Hardwired LED strips can be connected directly to your home’s electrical system, often allowing them to operate more efficiently. This setup can lead to lower energy consumption compared to plug-in models. It’s a small change that could make a significant difference in your electricity bill.
Customizable Control Options
With hardwired LED strips, you can integrate them into your existing smart home system or install dimmer switches for added flexibility. This means you can easily adjust the brightness to suit your mood or activity. Imagine setting the perfect lighting for a cozy movie night at the touch of a button.
Safety Advantages
Hardwiring reduces the risk of tripping over cords or overloading power outlets. This is particularly important in homes with children or pets. Plus, fewer exposed wires mean a reduced risk of electrical hazards.
Long-term Cost Effectiveness
While the initial cost of hardwiring might be higher, the long-term savings on energy and maintenance can offset this. You also won’t need to frequently replace damaged plugs or cords. Over time, you’ll likely find that hardwiring is a wise investment. So, is hardwiring LED strips right for your home? Consider your priorities in terms of aesthetics, efficiency, and safety. With these benefits in mind, you might find that hardwiring offers the perfect solution for your lighting needs.

Credit: tcpi.eu
Tools And Materials Needed
Hardwiring LED light strips requires specific tools and materials for a safe and lasting installation. Gathering everything before starting saves time and avoids interruptions. Each item plays a key role in the process.
Below are the essential tools and materials for hardwiring LED light strips effectively.
Basic Tools
- Screwdriver set for securing connections
- Wire strippers to remove insulation cleanly
- Multimeter to test voltage and continuity
- Drill with bits for mounting brackets
- Measuring tape to measure wire lengths
- Utility knife for trimming wires or strips
Electrical Components
- LED light strips with compatible voltage
- Power supply or driver matched to LED specs
- Wire connectors or terminal blocks for secure joins
- Electrical tape or heat shrink tubing for insulation
- Wire nuts for joining multiple wires safely
- Switch or dimmer switch for light control
Safety Gear And Accessories
- Insulated gloves to protect from electric shock
- Safety goggles to shield eyes during drilling
- Cable clips or adhesive mounts for wire management
- Label maker or markers to identify wires
Choosing The Right Led Strip
Choosing the right LED strip is important for a successful hardwiring project. The right strip ensures bright light, long life, and safe installation. Different LED strips suit different needs and spaces.
Consider brightness, color, and power requirements before buying. Knowing these details saves time and effort later. The right LED strip makes your space look great and works well with your wiring setup.
Understanding Led Strip Types
LED strips come in several types. Each type has different brightness and features. Common types include:
- Single-color strips
- RGB strips that change colors
- Addressable strips with individual LED control
Choose a type that fits your lighting goal. Simple white strips suit task lighting. RGB strips add mood and style.
Checking Voltage And Power Needs
LED strips run on different voltages, usually 12V or 24V. Check the strip’s voltage to match your power supply. Using the wrong voltage can damage the strip or cause poor performance.
Power consumption is important. The strip’s wattage tells how much energy it uses. Calculate the total wattage to select the right power supply. This helps avoid overloads and ensures safe wiring.
Considering Led Density And Brightness
LED density means how many LEDs are in one meter of the strip. Higher density means brighter light but more power use. Low-density strips save energy but give less light.
Brightness is measured in lumens. Check lumens per meter to find the right brightness. Choose bright strips for work areas and softer light for ambiance.
Waterproofing And Durability
Decide if your LED strip needs to be waterproof. Outdoor or damp areas require strips with IP65 or higher ratings. Indoor strips usually don’t need waterproof features.
Look at the strip’s build quality. A durable strip lasts longer and resists damage during installation.
Planning Your Wiring Layout
Planning your wiring layout is key to a clean and safe LED light strip installation. A well-thought plan prevents electrical problems and keeps your setup neat. Start by mapping out where the strips will go and where power sources are located. This helps avoid guesswork during installation and saves time.
Consider the length of each LED strip and the distance to the power supply. This guides the choice of wire gauge and connectors. Also, plan for any corners or obstacles that might require extra wiring or special connectors.
Assessing Your Power Source Location
Identify the closest power outlet or transformer. Measure the distance from this point to each LED strip. This ensures wires will reach without stretching or excess slack. Avoid placing the power source where it could get wet or overheated.
Mapping The Led Strip Placement
Draw a simple sketch of the area where the strips will be installed. Mark exact spots for each strip segment. Note any changes in direction or elevation. This helps visualize wire runs and needed connectors.
Choosing The Right Wire Gauge
Select wire thickness based on the total length and current load. Thicker wires reduce voltage drop and keep lights bright. Use a wire gauge chart to pick the correct size for your setup.
Planning For Connectors And Junctions
Decide where connectors, splitters, or junction boxes will go. Keep connections accessible for future maintenance. Ensure connectors match the LED strip type and wire gauge.
Considering Safety And Code Compliance
Check local electrical codes before starting. Plan to use insulated wires and secure mounting hardware. Avoid routing wires near heat sources or sharp edges. Safety first to prevent hazards.
Preparing The Power Source
Preparing the power source is a crucial step before you hardwire LED light strips. Without a stable and compatible power supply, your lights won’t perform well or might even get damaged. Taking time to ensure the power source matches your LED strips prevents headaches later and keeps your setup safe.
Checking Voltage And Current Requirements
Start by identifying the voltage your LED strips need—commonly 12V or 24V DC. Using a power supply with the wrong voltage can cause flickering or burn out your lights quickly.
Also, look at the current (amperage) rating of the strips. Your power supply should provide equal or more current than the total consumption of your LED strips combined.
Have you measured your strips’ power needs yet? This simple check can save you from troubleshooting later.
Choosing The Right Power Supply Type
Decide whether you want a plug-in adapter or a hardwired transformer. Plug-in adapters are easy but may clutter your space, while hardwired transformers offer a clean, permanent setup.
Consider where you’ll place your power supply. It should be in a dry, ventilated spot to avoid overheating and damage.
Think about your room layout and accessibility before picking the power supply location.
Preparing The Wiring And Connections
Use wires rated for your LED strip’s voltage and current to avoid safety issues. Typically, 18-22 gauge wires work well for most LED strips.
Strip the wire ends cleanly and twist them to make solid connections. Loose wires can cause flickering or shorts.
Have you double-checked your wire lengths? Too short wires can strain connections; too long might create clutter.
Testing The Power Source Before Final Installation
Before securing everything, test the power supply with your LED strips. Connect the wires temporarily and switch on the power.
Look for steady lighting without flickers or dim spots. If something feels off, double-check your connections and power specs.
Testing early can save you from dismantling the entire setup later on.
Credit: www.ledlightsworld.com
Connecting The Led Strip To Power
Connecting the LED strip to power is a crucial step in hardwiring LED lights. It ensures the strip receives the correct voltage and functions safely. Proper connection prevents flickering, short circuits, and damage to the lights. This section guides you through preparing wires, choosing connection methods, and securing your work.
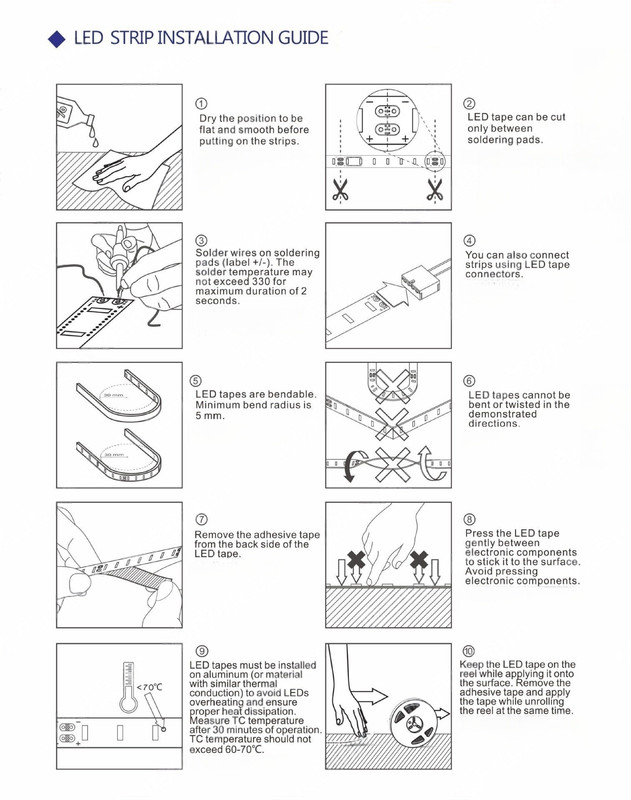
Stripping And Preparing Wires
Start by cutting the wires to the needed length. Use a wire stripper to remove about half an inch of insulation from each wire end. Make sure not to nick or damage the wire strands. Twist the exposed strands tightly to avoid fraying. Clean wire ends help create strong electrical contacts.
Using Connectors Vs Soldering
Connectors offer a simple and quick way to join wires without tools. They are ideal for beginners or temporary setups. Soldering creates a permanent, strong connection. It improves conductivity and reduces resistance. Choose connectors for easy maintenance and soldering for long-term reliability.
Securing Connections Safely
Insulate all exposed wires using electrical tape or heat shrink tubing. This prevents short circuits and protects against moisture. Use cable ties to keep wires organized and prevent stress on connections. Test your connections before finalizing the installation. Safe wiring extends the life of your LED strip.
Mounting The Led Strips
Mounting LED light strips properly is key to ensuring they stay in place and look great over time. The surface you choose and how you attach the strips can make a big difference in both appearance and longevity. Let’s break down the best ways to mount your LED strips securely and neatly.
Cleaning The Surface
Before sticking your LED strips, clean the surface thoroughly. Dust, grease, or moisture can prevent the adhesive from sticking properly. Use a cloth with rubbing alcohol or mild soap and water to wipe down the area.
Make sure the surface is completely dry before moving on. Have you ever noticed a strip peeling off after a week? It’s usually because the surface wasn’t clean enough.
Applying The Led Strip
Peel off the backing carefully without touching the adhesive side too much. Align the strip with your intended path and press it down firmly. Avoid stretching the strip as you apply—it can damage the LEDs or the adhesive.
Apply steady pressure along the entire strip, especially at the start and end points. If your strip is too long, cut only at designated marks to avoid breaking the circuit.
Securing With Clips Or Channels
For extra security, use mounting clips or aluminum channels designed for LED strips. Clips add mechanical hold, especially in places where adhesive alone might not be reliable, like textured walls or ceilings.
Channels not only keep strips secure but also help with heat dissipation and give a professional finish. Have you tried using channels before? They can transform a simple strip into a sleek lighting feature.
Using clips or channels is especially helpful in areas exposed to heat or moisture, like kitchens or bathrooms, where adhesive might fail over time.
Testing And Troubleshooting
Testing and troubleshooting your hardwired LED light strips is crucial to ensure they work perfectly and last long. It helps catch issues early, saving you time and frustration. Let’s focus on practical ways to spot and fix common problems you might face.
Checking For Power And Brightness
Start by confirming your LED strips are receiving power. Use a multimeter or simply observe if the strip lights up when switched on. If the strip is dim or not lighting at all, check your power supply connections for loose wires or incorrect polarity.
Remember, LED strips are sensitive to voltage. Even a slight drop can cause dim lights. If your setup includes a dimmer, test the strip without it to rule out dimmer faults.
Have you noticed some sections are brighter than others? This uneven brightness often points to voltage drop, especially with longer strips. Try powering the strip from both ends or adding a thicker gauge wire for better current flow.
Fixing Flickering Or Dead Sections
Flickering lights can be irritating and hint at a poor connection or faulty components. Check all solder joints, connectors, and adapters for secure fits. Sometimes, simply unplugging and reconnecting can stop the flicker.
If you find dead sections, isolate the problem by testing each segment individually. A bad LED chip or damaged circuit track might be the cause. Replacing the faulty section or patching the circuit can bring your strip back to life.
Consider environmental factors too. Excessive heat or moisture can cause flickering or failure. Are your strips installed in a place where they might be exposed to such conditions? If yes, adding protective covers or relocating the strip could help.
Maintenance Tips For Longevity
Proper maintenance ensures your hardwired LED light strips last longer and perform better. Small efforts keep them bright and prevent damage. Regular care saves money on repairs and replacements.
Keep The Strips Clean And Dust-free
Dust and dirt reduce light brightness and cause overheating. Use a soft cloth or brush to gently clean the strips. Avoid water or harsh chemicals that can damage the LEDs or wiring.
Check Connections Regularly
Loose or corroded connections cause flickering or failure. Inspect all wiring and connectors for tightness and corrosion. Tighten any loose parts and clean off any rust or dirt carefully.
Avoid Overloading The Circuit
Too many strips on one power source cause overheating and damage. Follow the manufacturer’s power limits strictly. Use separate power supplies if needed to balance the load.
Protect From Moisture And Heat
Water and high heat shorten LED lifespan. Install strips in dry areas or use waterproof covers. Keep them away from heat sources like heaters or direct sunlight.
Use A Quality Power Supply
Stable voltage prevents flickering and damage. Choose a power supply with the right wattage and good reviews. Replace old or faulty power supplies promptly.

Credit: www.reddit.com
Frequently Asked Questions
How Do You Safely Hardwire Led Light Strips?
Turn off power before starting. Use proper connectors and insulated wires. Follow manufacturer wiring diagrams carefully. Secure connections with wire nuts or solder. Test with a voltage tester before finalizing. Ensure compliance with local electrical codes for safety.
What Tools Are Needed To Hardwire Led Light Strips?
You need wire strippers, screwdrivers, voltage tester, wire nuts, and electrical tape. A drill and mounting clips help secure strips. A multimeter can check connections. Proper tools ensure safe, durable wiring and smooth installation.
Can I Hardwire Led Strips To A Power Supply Directly?
Yes, if the power supply matches LED voltage and current. Use the correct connectors and polarity. Ensure the power supply is UL-certified and suitable for your LED strip type. Avoid overloading circuits to prevent damage.
Is Hardwiring Led Strips Better Than Plug-in?
Hardwiring offers a cleaner look and stable power. It reduces accidental disconnections and clutter. However, it requires electrical knowledge and safety precautions. Plug-in is simpler but less permanent and tidy.
Conclusion
Hardwiring LED light strips is a simple way to get steady power. It helps keep your lights bright and reliable. Always check your wiring and connections for safety. Use the right tools and follow steps carefully. This ensures your lights work well and last longer.
Enjoy the clean look without messy cords. Now, you can light up any space with confidence. Easy, neat, and effective.