Are you ready to transform your car’s interior with a sleek, modern glow? Installing LED strip lights in your car is easier than you think, and it can instantly upgrade your driving experience.
Whether you want a cool ambiance for night drives or a unique style that stands out, this guide will walk you through every step. By the end, you’ll know exactly how to install LED strip lights quickly and safely—no guesswork, no hassle.
Keep reading to light up your ride like a pro!
Choosing The Right Led Strip Lights
Choosing the right LED strip lights for your car sets the foundation for a successful installation. The perfect strips will match your style, meet your lighting needs, and last long. Consider the type, brightness, color options, and durability before buying. These factors help you find strips that work well with your vehicle and driving habits.
Types Of Led Strips For Cars
Car LED strips come in various types. Single-color strips provide a steady light in one shade. RGB strips offer multiple colors and modes, controlled by a remote or app. Some strips have built-in sensors that change colors based on music or car movement. Choose strips that fit your design and control preferences.
Brightness And Color Options
Brightness affects how visible and stylish the lights appear. Look for strips with adjustable brightness levels. Color options range from basic white or red to vibrant RGB. White lights improve visibility, while colored lights add a unique look. Pick colors that suit your car’s interior and exterior.
Waterproof And Durability Features
Car lights face water, dust, and heat. Waterproof LED strips prevent damage from rain or washing. Check for IP65 or higher ratings for good protection. Durable materials resist wear and tear from road conditions. Strong adhesive backs help strips stay in place over time. Investing in quality ensures long-lasting performance.

Credit: www.jaginfo.org
Tools And Materials Needed
Before you start installing LED strip lights in your car, gathering the right tools and materials is crucial. Having everything ready prevents interruptions and ensures a smooth installation process. You’ll find that some tools are absolutely essential, while others can make your job easier and more professional-looking.
Essential Tools For Installation
Start with basic tools that help you handle wiring and mounting efficiently. A good quality wire stripperis necessary to remove insulation without damaging the wires. You’ll also need a soldering ironif you plan to create secure electrical connections, though some LED strips come with plug-and-play connectors.
Don’t forget a reliable multimeterto check voltage and continuity. This can save you a lot of troubleshooting time later. A pair of needle-nose pliersis handy for bending wires and fitting them into tight spaces.
Finally, a heat gun or lighterhelps seal connections with heat shrink tubing, which protects wires from short circuits and moisture. These tools are the backbone of a safe and lasting LED strip installation.
Additional Accessories
Beyond the basics, some accessories can elevate your installation quality. Adhesive mounting clipsor double-sided tapeensure the LED strips stay securely attached without messy glue. If your car’s interior has tricky corners, flexible extension wiresmake routing easier.
Consider fuse holdersfor added electrical safety. Installing a fuse close to the power source protects your car’s electrical system from overloads. Also, wire connectorslike quick splice connectors speed up wiring without soldering.
Have you thought about how you’ll hide the wires? Cable sleeves or spiral wrap keep everything neat and prevent snagging. Paying attention to these details makes your installation look professional and lasts longer under car vibrations.
Preparing Your Car For Installation
Clean the car’s interior surfaces where the LED strips will stick. Make sure the area is dry and free of dust for better adhesion. Disconnect the car battery to avoid any electrical issues during installation.
Preparing your car for installing LED strip lights is a crucial step that sets the stage for a successful installation. Think of it as laying the foundation before building a house. A little prep work goes a long way in ensuring your lights look great and function well.
Cleaning The Surface
Before you start, it’s essential to clean the surfaces where you’ll attach the LED strips. Dust and grease can prevent the adhesive from sticking properly. Use a mild detergent and water to wipe down these areas, then dry them thoroughly. Consider using an alcohol wipe for a final cleanse, as it evaporates quickly and leaves no residue. This ensures a strong bond, preventing your lights from falling off over time. Make this step a priority, and you’ll thank yourself later.
Planning The Placement
Decide where you want to place the LED strips for maximum effect. Do you want a subtle glow under the dashboard or a more dramatic look along the car doors? Visualize the outcome and measure the areas to ensure you have enough strip length. Think about the wiring and power source, too. How will you hide the wires for a clean look? Consider the proximity to your car’s power outlet or battery. A little planning saves you from unwanted surprises during installation.
Wiring And Power Connection
Wiring and power connection are the heart of installing LED strip lights in your car. Proper connections ensure your lights work reliably without draining the battery or causing electrical issues. Let’s break down how to identify power sources, connect safely, and add switches or controllers for easy control.
Identifying Power Sources
Start by locating a suitable power source for your LED strips. You can tap into your car’s battery or use the fuse box, but it’s important to choose a source that matches your LED strip’s voltage requirements.
Look for circuits that turn on with the ignition if you want the lights to activate only when the car is running. Alternatively, a constant power source keeps the lights on all the time, but this can drain your battery if you forget to switch them off.
Connecting To Car Battery Or Fuse Box
Connecting directly to the car battery is straightforward but requires caution. Use an inline fuse to protect the LED strips and your vehicle’s electrical system from short circuits or overloads.
If you prefer a cleaner setup, tapping into the fuse box with an add-a-circuit adapter is a smart choice. This method allows you to draw power safely from existing circuits without cutting wires, keeping your car’s warranty intact.
- Always disconnect the car battery before working on electrical connections.
- Use quality connectors and secure all wiring to avoid loose contacts.
- Test your connections with a multimeter before finalizing the installation.
Using Switches And Controllers
Adding a switch gives you manual control over when your LED strips turn on or off. You can install a toggle switch in an accessible spot on your dashboard or use a remote controller for wireless operation.
Many LED strip kits come with controllers that allow you to change colors, brightness, and lighting modes. These controllers usually connect via a simple plug-and-play setup, making it easy even if you’re new to car lighting.
Have you considered how controlling your LED strips might affect your driving experience? Easy-to-reach switches prevent distractions while driving, and programmable controllers can match your mood or driving conditions effortlessly.
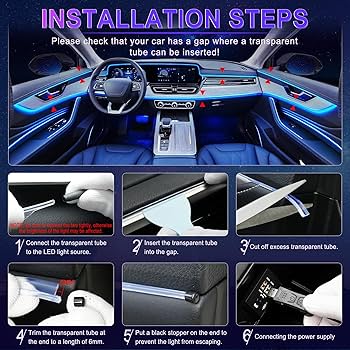
Installing The Led Strip Lights
Installing LED strip lights in your car can instantly transform your driving experience. The process involves careful cutting, fitting, and securing to make sure the lights look great and stay in place. Let’s dive into the key steps that will help you get your car glowing just the way you want.
Cutting And Fitting The Strips
LED strips are designed to be cut at specific points, usually marked by a line or a scissor icon. Use sharp scissors or a utility knife to make a clean cut exactly at these marks. Cutting elsewhere can damage the strip or cause sections not to light up.
After cutting, test fit the strips inside your car before sticking them down. Check how they contour to areas like footwells, door panels, or under the dashboard. If the strip needs bending, be gentle to avoid breaking the circuit.
Securing The Strips In Place
Most LED strips come with adhesive backing. Clean the surface thoroughly with rubbing alcohol to remove dust and grease. This ensures the adhesive sticks firmly and prevents the strips from falling off over time.
If the adhesive isn’t strong enough, consider using additional mounting clips or double-sided automotive tape. Press the strip firmly and hold it for a few seconds to strengthen the bond. Make sure wires are tucked away neatly to avoid interference with pedals or seats.
Testing The Lights
Before finalizing installation, connect the LED strips to your power source and turn them on. Watch for any sections that don’t light up or flicker, which could indicate a loose connection or a faulty strip. This quick test saves you time and hassle later.
Try switching through different colors or modes if your strips have options. This helps confirm the controller and wiring are working correctly. If everything looks good, you’re ready to enjoy your custom lighting setup on every drive.

Credit: www.amazon.com
Safety Tips And Maintenance
Installing LED strip lights in your car can transform its interior ambiance, but ignoring safety and maintenance can lead to problems down the road. Paying attention to how you handle the electrical system and how you care for the strips ensures longevity and prevents costly repairs. Let’s dive into some practical tips that keep your LED setup running smoothly and safely.
Avoiding Electrical Issues
Always disconnect your car’s battery before starting the installation. This simple step prevents short circuits and protects both you and your vehicle’s electrical system.
Use a fuse adapter or inline fuse to protect your LED strips from power surges. Without proper fusing, a small electrical hiccup can damage the strips or your car’s wiring.
Check the voltage requirements of your LED strips carefully. Connecting a 12V strip to a higher voltage source can burn out the lights instantly.
- Secure all wiring with zip ties or clamps to prevent loose connections.
- Avoid routing wires near hot engine parts or sharp edges to reduce wear and tear.
- Test the lights before finalizing the installation to catch any wiring mistakes early.
Cleaning And Caring For Led Strips
Regular cleaning keeps your LED strips bright and looking new. Use a soft, damp cloth to wipe off dust and dirt gently.
Avoid harsh chemicals or abrasive materials that can damage the strip’s protective coating. Mild soap diluted in water works best if you need a deeper clean.
Check for any signs of peeling or water damage periodically, especially if your strips are near windows or doors. Moisture can cause shorts or corrosion over time.
- Inspect the adhesive backing to ensure the strips stay securely attached. Replace or reinforce if you notice peeling.
- Turn off your LED strips when the car is parked for extended periods to prolong their lifespan.
- Consider using a silicone sealant for extra protection if your strips are exposed to moisture frequently.
Have you ever overlooked a small wiring detail and faced electrical trouble later? Sharing your experience can help others avoid the same pitfalls.
Credit: www.amazon.ca
Frequently Asked Questions
How Do I Power Led Strip Lights In My Car?
You can power LED strips using your car’s 12V battery. Connect the positive and negative wires to the battery terminals or fuse box. Use a fuse for safety and ensure proper grounding to avoid electrical issues.
Where Should I Place Led Strip Lights Inside My Car?
Place LED strips under the dashboard, seats, or along door panels. These areas create ambient lighting without obstructing your view. Ensure strips are securely attached and wires are hidden for a clean installation.
Can Led Strip Lights Drain My Car Battery?
LED strip lights use minimal power and rarely drain the battery when the engine is off. However, avoid leaving lights on for extended periods without the engine running to prevent battery drain.
What Tools Do I Need For Installing Car Led Strips?
You’ll need LED strips, a power source, electrical tape, connectors, wire cutters, and a screwdriver. Optional tools include a multimeter and zip ties for a secure and neat installation.
Conclusion
Installing LED strip lights in your car is simple with the right steps. Choose the best location and clean the surface well. Attach the strips carefully and connect the wires to power. Test the lights before finalizing the setup. Enjoy the new look and bright glow inside your car.
Small changes can make your ride feel fresh and cool. Keep safety in mind and avoid blocking any controls. Now, your car lighting matches your style perfectly.