
Are you tired of using plastic wrap that harms the environment and clutters your kitchen? Imagine having a natural, reusable alternative that keeps your food fresh and looks great too.
Making your own beeswax cloth food wraps is easier than you think, and once you try them, you’ll wonder why you didn’t start sooner. In this guide, you’ll discover simple steps to create these eco-friendly wraps right at home. Ready to save money, reduce waste, and protect your food the natural way?
Let’s dive in!
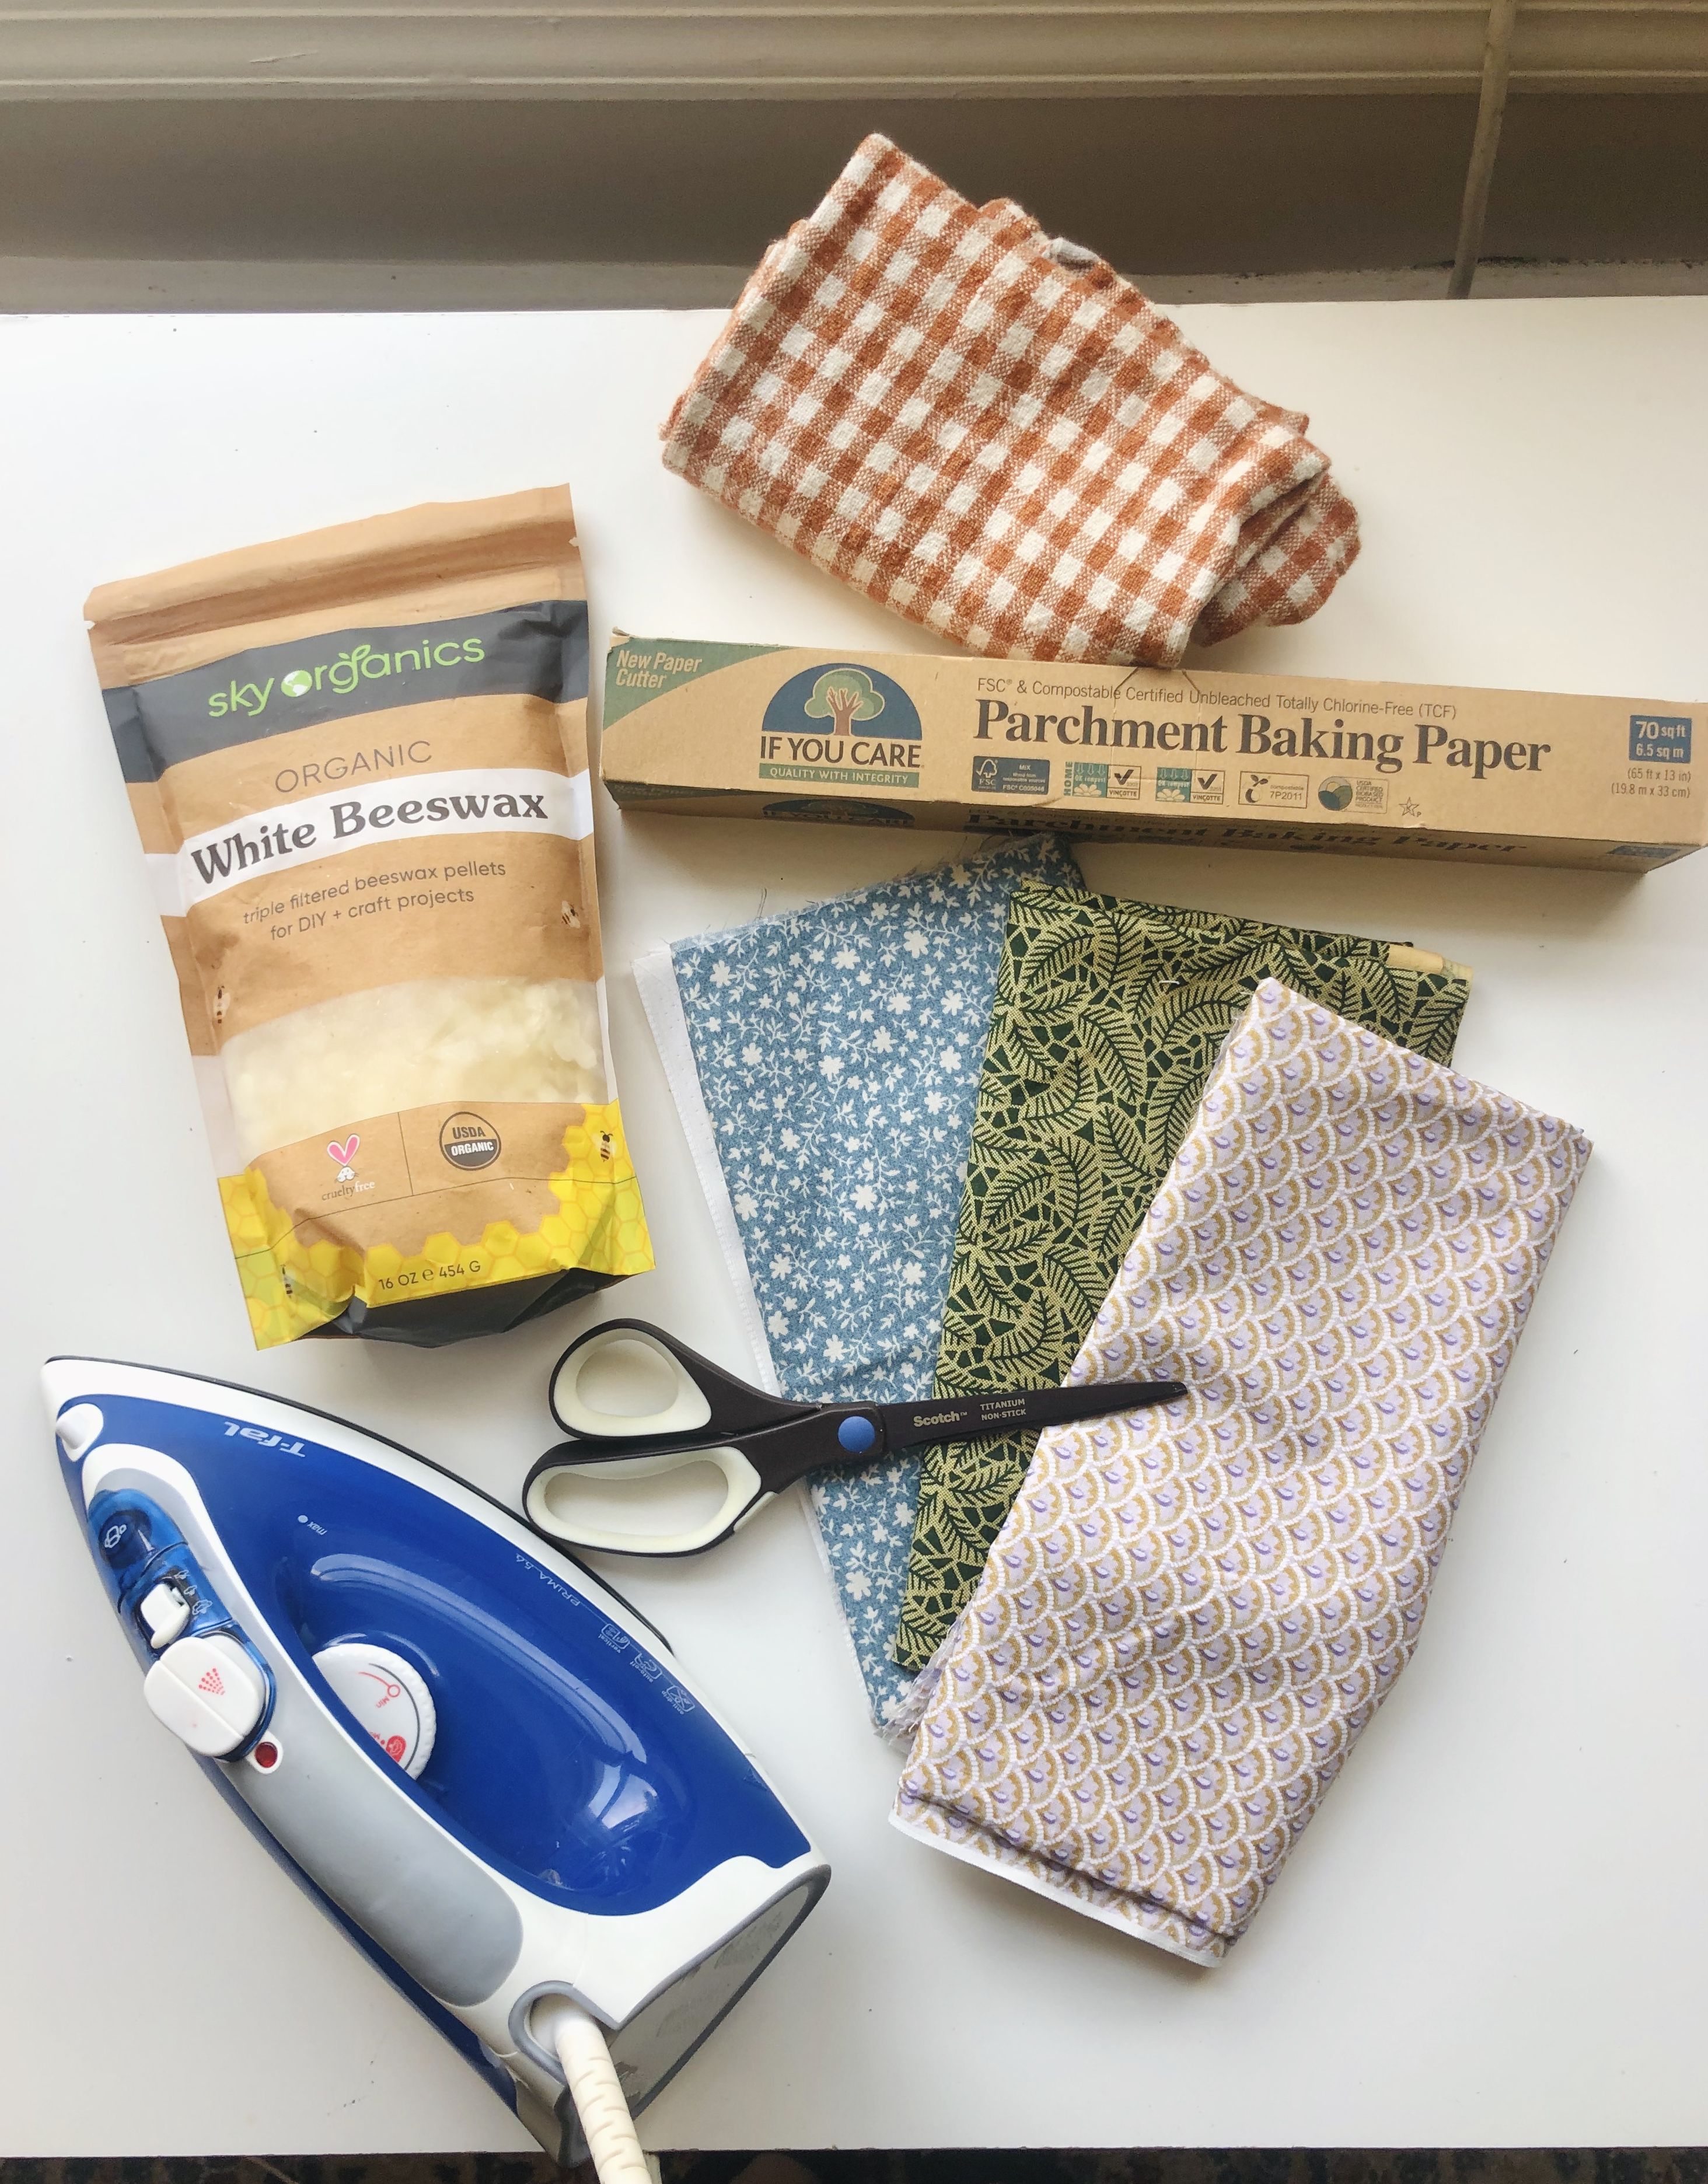
Materials Needed
Creating beeswax cloth food wraps is a fun and eco-friendly project. You need the right materials to ensure your wraps work well and last long. This guide will help you gather what you need.
Choosing The Right Fabric
Cotton is the best fabric for beeswax wraps. It is breathable and holds wax well. Look for 100% cotton fabric. It should have a tight weave for durability. Avoid synthetic blends as they don’t absorb wax properly.
Selecting Beeswax
Beeswax is the key ingredient in these wraps. Use natural, food-grade beeswax. It should be clean and free from debris. Beeswax pellets are easier to melt and spread evenly. Check local stores or online for quality beeswax.
Additional Supplies
- Pine Resin:Adds stickiness to the wraps.
- Jojoba Oil:Keeps wraps pliable and prevents cracking.
- Brush:Helps spread melted wax evenly.
- Parchment Paper:Protects surfaces during the waxing process.
- Baking Sheet:Holds fabric while applying wax.
Preparing The Fabric
Preparing the fabric is a crucial part of making beeswax cloth food wraps. The right fabric ensures your wraps are durable, flexible, and effective at keeping food fresh. Taking time to get this step right will make your beeswax wraps last longer and work better.
Cutting To Size
Choose cotton fabric that is lightweight but tightly woven. You can use old cotton sheets, T-shirts, or scrap fabric. Cut your fabric into squares or rectangles, depending on what you want to wrap.
Think about the sizes you frequently use in your kitchen. Small wraps around half a sandwich might be 7×7 inches. Larger wraps for bowls or trays could be 12×12 inches or bigger.
Using a rotary cutter or sharp fabric scissors will give you clean edges. Clean cuts prevent fraying and make your wraps look neat. Have you ever struggled to wrap an oddly shaped bowl? Cutting fabric to fit your common containers can solve that problem.
Washing And Drying
Before waxing, always wash your fabric. This removes any dirt, oils, or chemicals that could affect the wax’s grip or your food’s safety. Use hot water and a mild detergent for the best clean.
Dry your fabric completely before adding beeswax. Damp fabric can cause the wax to clump or not stick evenly. I once skipped this step and ended up with uneven patches that made wrapping frustrating.
Iron the fabric after drying to smooth out wrinkles. A flat surface helps when applying wax, making sure it spreads evenly. Wouldn’t you want your wraps to look as good as they work?
Melting Beeswax
Melting beeswax is a key step in making your own beeswax cloth food wraps. It transforms the solid wax into a liquid, allowing it to evenly coat the fabric for a flexible, reusable wrap. Getting the temperature right is crucial to avoid burning the wax while ensuring it melts smoothly.
Double Boiler Method
Using a double boiler is one of the safest ways to melt beeswax. Fill a pot with water and place a heat-safe bowl on top, making sure the bowl doesn’t touch the water. This setup gently heats the wax, preventing it from overheating or catching fire.
Stir the beeswax occasionally as it melts to help it liquefy evenly. This method gives you control over the melting process and reduces the risk of damaging the wax’s natural properties. Have you ever had wax burn on you? This technique will help you avoid that frustration.
Using An Oven
You can also melt beeswax in an oven, which works well if you’re melting larger quantities. Preheat the oven to around 160°F (70°C), then place beeswax chunks in an oven-safe container. Keep a close eye on it to prevent overheating.
Check the wax every 5-10 minutes and stir gently to speed up the melting. This method is hands-off and lets you prepare multiple wraps at once. However, are you ready to watch your wax carefully to avoid scorching? That attention makes all the difference.
Credit: food52.com
Applying Beeswax
Applying beeswax is a key step in making beeswax cloth food wraps. It seals the fabric and makes it reusable and water-resistant. The beeswax must be spread evenly for the best results. Both brushing and sprinkling work well. Each method has its own benefits and can fit different preferences and tools.
Brushing Technique
Use a clean, natural bristle brush for this technique. Melt the beeswax gently until it becomes liquid but not too hot. Dip the brush into the melted beeswax and apply it to the fabric in smooth strokes. Cover the entire surface evenly without leaving thick spots. Brush both sides of the cloth for stronger wraps. After brushing, warm the fabric slightly with a hairdryer to help the wax soak in. This creates a smooth, flexible finish.
Sprinkling Method
Start with a block of solid beeswax. Grate or shave small pieces over the fabric surface. Spread the wax shavings evenly to avoid clumps. Place a sheet of parchment paper on top of the fabric. Use a warm iron on low heat to melt the wax into the cloth. Move the iron slowly to cover all areas. This method gives good control over wax distribution. It also works well for thicker or patterned fabrics.
Setting The Wrap
Setting the beeswax cloth wrap is a key step to make it useful and long-lasting. This process ensures the wax spreads evenly and binds well to the fabric. Proper setting makes the wrap flexible, sticky, and ready to cover your food. Follow these simple steps to get the perfect finish for your wrap.
Heating For Even Coating
Place the cloth with beeswax on a flat surface. Use a warm iron or oven to melt the wax. Heat gently to avoid burning the wax or fabric. Move the heat source evenly over the cloth. This helps the wax spread smoothly across the entire surface. Watch the wax as it melts and fills the fabric pores. The goal is an even, thin layer of wax without clumps.
Cooling And Hardening
After heating, let the wrap cool on a flat surface. The wax will harden as it cools down. Keep the wrap flat to avoid wrinkles or folds. This step makes the wrap firm but still flexible. Cooling also locks the wax into the fabric. Once cool, the wrap is ready to use for fresh food storage.

Credit: lentinealexis.com
Using Your Beeswax Wraps
Beeswax wraps offer a natural way to keep food fresh without plastic. Using them correctly helps extend the life of your food and reduces waste. These wraps are flexible and easy to use for many types of food.
Wrapping Food Items
Wrap fruits, vegetables, cheese, or bread with beeswax cloth. The wrap clings by gentle pressure and body heat. Cover cut fruits like apples or avocados to prevent browning.
For cheese, wrap tightly to keep moisture in. Use beeswax wraps over bowls or containers as lids. Avoid wrapping raw meat or fish directly to prevent contamination.
Storage Tips
Store beeswax wraps in a cool, dry place. Keep them away from heat sources to maintain their shape and stickiness. After use, wash wraps with cool water and mild soap.
Do not use hot water or strong detergents. Air dry completely before folding and storing. Folding helps keep wraps clean and ready for next use.
Cleaning And Maintenance
Keeping your beeswax cloth food wraps clean and well-maintained is key to getting the most out of them. Proper care not only preserves their natural properties but also ensures they stay fresh and safe for your food. Let’s look at how you can wash and extend the life of these eco-friendly wraps with simple steps.
Washing Instructions
After using your beeswax wraps, avoid soaking them in water or putting them in the dishwasher. Instead, gently wash them by hand using cool water and mild soap.
Scrub softly with a sponge or cloth to remove any food residue. Hot water can melt the wax, so keep the temperature low.
Once cleaned, hang the wrap to air dry completely before storing it. Never wring or twist the wrap, as this can damage the wax coating.
Extending Wrap Life
Do you want your wraps to last longer? Store them in a dry, cool place away from direct sunlight, which can break down the wax faster.
If your wrap starts to lose its stickiness or flexibility, you can refresh it by placing it between two sheets of parchment paper and gently warming it with a clothes iron or in an oven at low heat for a few minutes.
This reactivates the wax and helps the wrap regain its shape and grip. Avoid folding your wraps too tightly to prevent cracking.
Have you tried using beeswax wraps for leftovers or sandwich packing? How do you care for them? Sharing your tips can help others enjoy their wraps longer too.
Benefits Of Beeswax Wraps
Beeswax cloth food wraps offer more than just a natural alternative to plastic wrap—they bring a range of benefits that can improve your kitchen routine and support a healthier planet. Once you start using these wraps, you might find yourself wondering why you ever stuck to disposable options. Their advantages go beyond simple food storage, touching on environmental impact and your wallet.
Eco-friendly Impact
Beeswax wraps reduce the amount of single-use plastic that ends up in landfills and oceans. Unlike plastic wrap, which can take hundreds of years to break down, beeswax wraps are biodegradable and compostable. This means you help cut down on pollution simply by switching what you wrap your sandwiches and leftovers with.
Using beeswax wraps also supports sustainable beekeeping, which is vital for pollination and healthy ecosystems. When you choose these wraps, you’re indirectly contributing to the survival of bee populations, which are essential for growing many foods you enjoy every day. Have you ever thought about how your food storage choices impact the environment?
Cost Savings
Beeswax wraps are reusable and durable, lasting for up to a year with proper care. This longevity means you won’t need to keep buying plastic wrap or aluminum foil, which adds up quickly over time. Imagine the money you can save by investing once and using your wraps repeatedly.
Cleaning beeswax wraps is simple—just rinse with cool water and mild soap, then air dry. There’s no need for expensive or complicated maintenance, which makes them even more practical for everyday use. Are you ready to make a small change that benefits both your budget and your kitchen habits?
Troubleshooting Common Issues
Making beeswax cloth food wraps can be fun and eco-friendly. Sometimes, small problems happen during use or making. Knowing common issues helps keep your wraps working well. This section explains how to fix those common problems.
Wax Buildup
Wax buildup can make your wrap stiff and hard to fold. It happens if too much wax is applied during making. To fix this, gently warm the wrap using a hairdryer. This softens the wax and makes the wrap flexible again.
Another way is to place the wrap between two sheets of baking paper. Then, use a warm iron on low heat to spread the wax evenly. Do this carefully to avoid melting too much wax in one spot.
Loss Of Stickiness
Wraps lose stickiness after many uses or washing. Oils or dirt on the wrap reduce its grip. Clean the wrap with cool water and mild soap. Avoid hot water as it melts the wax.
If the stickiness is low, re-wax the cloth. Melt beeswax and brush a thin layer on the wrap. Use a warm iron to spread the wax evenly. This restores the wrap’s natural stickiness and keeps food fresh.

Credit: aboderie.co.uk
Frequently Asked Questions
What Materials Are Needed For Beeswax Cloth Wraps?
You need cotton fabric, beeswax pellets, pine resin, and jojoba oil. These materials create flexible, reusable, and natural food wraps. Use organic and clean fabric for best results.
How Do You Apply Beeswax To Fabric?
Sprinkle beeswax evenly on fabric, then melt it using an iron or oven. Ensure even coating for proper sealing and flexibility. Let it cool before use.
How Long Do Beeswax Wraps Last?
Beeswax wraps last about 6 to 12 months with proper care. Avoid heat and washing in hot water to maintain their durability. Refresh by reapplying beeswax if needed.
Are Beeswax Wraps Safe For All Food Types?
Yes, beeswax wraps are safe for fruits, vegetables, cheese, and bread. Avoid wrapping raw meat or fish to prevent contamination. Always clean wraps gently after use.
Conclusion
Making beeswax cloth food wraps is simple and fun. You only need a few natural materials. These wraps help keep food fresh without plastic. They are easy to clean and reuse many times. Using beeswax wraps reduces waste and helps the environment.
Try making your own wraps at home today. Save money and protect the planet. Small changes like this make a big difference. Give it a try and enjoy fresh food the eco-friendly way.